|
How to check my hardware on my iPhone 4
I received my second replacement iPhone 4 yesterday. Considering the issues my first two iPhone 4 units had, I wanted to make absolutely certain, in as little time as possible, that this replacement unit didn't have anything wrong with it. Before I even picked it up from the store, I started putting together a list of items I needed to test as well as how I would go about doing it.
What I came up with is a series of hardware checks that anyone can perform right after taking an iPhone 4 out of the box and syncing it for the first time. This is by no means the only way to test an iPhone 4's hardware for defects, and there are probably more comprehensive methods out there, but the following procedure is basic enough for almost any user to follow. Plus, it should catch any glaring hardware defects in an iPhone 4 right away. Click "Read More" for the checklist.
Things to check before you sync with iTunes for the first time:
Outer Casing: Inspect for cracks in the glass, visible gaps, and loose joints. The phone should be solid, with no "give" anywhere -- a properly constructed iPhone 4 is pretty much a solid glass/steel slab. In particular, the front and rear glass should be flush against the stainless steel antenna band. Any gaps will not only allow dust inside the iPhone, they also act as a pivot point, reducing the structural integrity of the glass and making it more likely to break after an accidental drop. Such gaps are both incredibly rare (I'm probably the only guy "lucky" enough to get hit with this issue twice) and very difficult to see. Hold the iPhone sideways with a strong light source in the background. So long as you don't see anything like this, you're good to go:
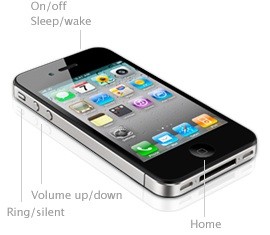
Home/Sleep Buttons: Yet another item you can test before syncing the iPhone, these buttons should perform their intended functions right away and should neither be excessively loose nor too sticky. A miniscule wiggle or a little "clickiness" in either button is nothing to worry about, but if your Sleep button is rattling around in the casing or needs Herculean pressure to get it to work, there's a problem.
Vibrate switch/motor: Flick this switch to put the iPhone in vibrate. The button should slide smoothly, and you should immediately feel the phone's vibrate motor kick in, indicating successful activation.
Things to check during the first sync with iTunes:
Dock connector: If there's anything wrong with the dock connector, you'll know right away; either your iPhone won't sync with your computer, or it won't charge.
Flash memory: It's not particularly common, but if the iPhone's flash memory chips are corrupted, this could show up as syncing errors in iTunes. One bad sync isn't enough to pin the problem on the iPhone itself -- iTunes is a fiddly beast at the best of times -- but if you're unable to get the iPhone to sync successfully despite numerous attempts and some basic iTunes troubleshooting, bad flash memory in the iPhone may be the culprit. The simplest way to test the memory is to use it; fill your iPhone with as much media as you can during that first sync. If you have a 32 GB iPhone 4, now's a good time to go do something else for an hour or two, because syncing that much data takes a while.
Things to check after syncing with iTunes:
Volume buttons: It'll be obvious right away if these don't work. Note that a little bit of side-to-side "play" in these buttons is normal and nothing to fret over.
Headphone jack: Plug in the headphones that came with the iPhone. There should be no wiggle in this jack at all. You should hear sound in both headphones while playing media; if you don't, plug in a different set of headphones to make sure it's not a headphone problem rather than a jack problem. Test the headphones' controls, too; play/pause, track forward/back, VoiceOver, and volume up/down should all function normally. VoiceOver should be able to pick up your voice from the headphone microphone.
Camera: Verify that the shutter opens and closes on both the front- and rear-facing cameras by taking still photos with both. Test the iPhone's "tap to focus" feature by aiming the camera at a scene with marked differences in distance/brightness -- a bright window in the background of a dark room, for example -- and make sure the camera adjusts focus/brightness according to where you tap the screen. Check the photos for obvious issues like discoloration, pixellation, banding, etc. -- you're not going to get museum-quality images from the iPhone 4's 5 megapixel sensor, but the photos should be free of glaring, obvious defects. Test that the LED flash fires when you take photos by tapping the upper left corner of the screen until the flash setting reads "on." Now test both cameras again by taking videos with each one. Video from both cameras should be free of stuttering, and, obviously, you should be able to hear sound when you play the video back.
Accelerometer: You can test the accelerometer's function at the same time as the camera; on-screen controls should change position as you tilt the iPhone from portrait to landscape mode. Next, open any app that accepts text input, type a few characters, and then shake the iPhone; a dialog should pop up immediately asking if you want to undo typing or cancel.
[1] [2] [3] 下一页 【已有很多网友发表了看法,点击参与讨论】【对英语不懂,点击提问】【英语论坛】【返回首页】
|